Thứ Ba, 20 tháng 12, 2016

Mô hình thêm mới 01 cell trong dinte openxml

1. Khi tạo một workbook, đã mặc định thêm mới 1 thành phần style vào stylesheet bằng hàm
WorkbookStylesPart stylesPart = _workbookPart.AddNewPart<WorkbookStylesPart>(); stylesPart.Stylesheet = CStyle.GenerateStyleSheet();
 stylesPart.Stylesheet.Save();

2. Khi khởi tạo một style, đã khởi tạo các thành phần cơ bản
cStyle = new CStyle();
Trong CStyle.cs
public CStyle()
        {
            numberFormatCode = null;
            fontSize = 11;
            fontName = "TimeNewRoman";
            fontColor = "000";
            fontBold = false;
            fontItalic = false;
            fillPattern = PatternValues.None;
            fillForeGroundColor = null;
            borderLeftColor = null;
            borderLeftStyleValue = BorderStyleValues.None;
            borderBottomColor = null;
            borderBottomStyleValue = BorderStyleValues.None;
            borderRightColor = null;
            borderRightStyleValue = BorderStyleValues.None;
            borderTopColor = null;
            borderTopStyleValue = BorderStyleValues.None;
            alignmentHorizontal = HorizontalAlignmentValues.Left;
            alignmentVertical = VerticalAlignmentValues.Center;
            wrapText = true;
            textRotate = (uint)0;
        }
3. Có thể khai báo các thuộc tính cho style thông qua
cStyle.alignmentHorizontal = HorizontalAlignmentValues.Left;
 Style.fontName = "Times New Roman";
 cStyle.fontSize = 12;
 Khi cStyle.CreateStyle(); sẽ tạo style theo tất cả các thuộc tính đã set -> CStyle.cs (line 97), hàm này sẽ bổ sung các thuộc tính quan trọng:
         public Fill _oFill { get; set; }
        public Border _oBorder { get; set; }
        public Font _oFont { get; set; }
        public Alignment _oAlignment { get; set; }
        public NumberingFormat _oNumberingFormat { get; set; }
Chú ý:
Riêng đối với _oNumberingFormat phải quan tâm tới NumberFormatId
Hàm InsertNumberingFormat
public uint InsertNumberingFormat(NumberingFormat numberingFormat, WorkbookPart workbookPart)
        {
            NumberingFormats numberingFormats = workbookPart.WorkbookStylesPart.Stylesheet.Elements<NumberingFormats>().First();
            //cập nhật id cho numberingFormat
            numberingFormat.NumberFormatId = numberingFormats.Count;
            numberingFormats.Append(numberingFormat);
            return (uint)numberingFormats.Count++;
        } 

Cuối cùng, hàm
public uint GetStyleIndex(WorkbookPart _workbookPart, Cell cell)
        {
            CellFormat cellFormat = cell.StyleIndex != null ? this.GetCellFormat(cell.StyleIndex, _workbookPart).CloneNode(true) as CellFormat : new CellFormat();
            this.AppendCellFormat(cellFormat, _workbookPart); //là hàm quan trọng để tạo các format
            uint styleIndex = this.InsertCellFormat(cellFormat, _workbookPart);
            return styleIndex;
        }

Sẽ thêm mới một style và trả về styleIndex


Thứ Ba, 6 tháng 12, 2016

How to Use ViewModel in Asp.Net MVC with Example

Here we will learn what is viewmodel in asp.net mvc and how to use viewmodel in asp.net mvc applications with example.

ViewModel in Asp.Net MVC

The viewmodel in asp.net mvc represent only the data we want to display on view whether it is used for displaying or for taking input from view. If we want to display more than one model on view in asp.net mvc then we need to create a new viewmodel. Following image shows visual representation of view model in asp.net mvc.
Here we will learn asp.net mvc viewmodel with simple example if we have a Customer entity and Order entity. In view to display both entities (Customer entity + Order entity) data then we need to create viewmodel (CustomerVM) and we will select the properties whichever we want to display from both entities (Customer entity + Order entity) and create a viewmodel.

viewmodel structure in asp.net mvc application

Now start with creating a viewmodel in asp.net mvc before that let's have look on table which we are going to use in our application.

Thứ Sáu, 2 tháng 12, 2016

Hướng dẫn cài đặt PostgreSQL 9.5, PostGIS 2.2 and pgRouting 2.1.0 trong Centos

Postgres là hệ quản trị cơ sở mã nguồn mở hỗ trợ rất mạnh các hệ thống thông tin bản đồ (webgis). Tài liệu này sẽ hướng dẫn cài đặt PostgreSQL 9.5; PostGIS; Pgrouting trong hệ điều hành CentOS 6
Kết quả hình ảnh cho postgresql pgrouting 

Thứ Tư, 30 tháng 11, 2016

Hive đọc dữ liệu từ HDFS


Trong bài trước đã hướng dẫn sử dụng Hive phân tích dữ liệu chứng khoán. Trong ví dụ đó, tôi sử dụng lệnh “load data local inpath” để đưa dữ liệu từ thư mục lưu trữ trên máy local vào tảng dữ liệu đã được tạo sẵn trong hive. Lệnh trên cũng đồng thời tạo thư mục NYSE trong workspace của Hive trên HDFS. Với lệnh trên, tôi phân vân rằng liệu với dữ liệu streaming (sử dụng Apache Flume liên tục đẩy dữ liệu vào HDFS) thì làm thế nào để Hive có thể đọc được (dữ liệu mới được tự động đẩy vào Hive table để phân tích). Rất may Hive đã làm cho tôi việc này. Để hiểu rõ hơn cơ chế đọc dữ liệu của Hive, tôi đã test một trường hợp sau:
 Kết quả hình ảnh cho hive hdfs

Thứ Ba, 29 tháng 11, 2016

Sử dụng Hive trong phân tích chiều hướng của cổ phiếu


Trong bài trước đã hướng dẫn cài đặt hive trong môi trường centos. Bài này sẽ hướng dẫn một case cụ thể, sử dụng Hive phân tích chiều hướng của hai loại cổ phiếu. Dữ liệu thử nghiệm được lấy từ ‘NYSE_daily_prices_Q.csv’ là dữ liệu của hai mã cổ phiếu QRR và QTM của sàn NewYork.
 Kết quả hình ảnh cho new york stoke

Hướng dẫn cài đặt Hive trong Centos

Trong bài trước đã giới thiệu tổng quan về một số công cụ phân tích dữ liệu trong hệ sinh thai hadoop. Bài này sẽ hướng dẫn cài dặt Apache Hive trong môi trường CentOS/RHEL.
Kết quả hình ảnh cho apache hive centos 

Phân tích dữ liệu lớn với công nghệ Hadoop

Với sự phát triển của công nghệ và số lượng người dùng internet, một khối lượng khổng lồ đang được sinh ra hàng ngày gồm các loại dữ liệu đa cấu trúc như hình ảnh, video, weblog, dữ liệu thu nhận từ các cảm biến… Từ đó nảy sinh nhu cầu lớn về lưu trữ, xử lý, phân tích dữ liệu để từ đó khai phá các thông tin hữu ích


Thứ Hai, 28 tháng 11, 2016

When is the Right Time for Real-Time with Hadoop?

Bài viết giải đáp một phần câu hỏi: khi nào sử dụng phân tích dữ liệu theo lô và khi nào sử dụng phân tích dữ liệu thời gian thực trong hadoop. và một số mô hình sử lý thời gian thực.

Thứ Bảy, 26 tháng 11, 2016

Tự xây dựng ứng dụng truy vấn dữ liệu với Flume


Hiện tôi đang nghiên cứu về Apache Flume. Đây là một công cụ rất mạnh để thu thập dữ liệu cho kho dữ liệu hadoop. Flume cũng cung cấp nhiều source sẵn có cho phép người dùng truy cập các nguồn dữ liệu khác nhau. Người dùng cũng có thể tự xây dựng thư viện truy cập tới nguồn dữ liệu khác.

Thứ Sáu, 25 tháng 11, 2016

Cài đặt Maven trong CentOS


Apache Maven là công cụ quản lý mã nguồn và build source code từ java. Để cài đặt Maven trong môi trường CentOS, bạn có thể làm theo các bước sau: 
Trong tài liệu này, tôi sử dụng apache-maven-3.0.5
 
Kết quả hình ảnh cho maven

1. Hãy chắc chắn bạn đã cài đặt Java (để cài đặt java 8 bạn có thể tham khảo tại đây
2. Tải về phiên bản Maven phù hợp (Từ đây, tất cả các lệnh được tôi sử dụng dưới tài khoản root)
$ wget http://mirror.cc.columbia.edu/pub/software/apache/maven/maven-3/3.0.5/binaries/apache-maven-3.0.5-bin.tar.gz
$ sudo tar xzf apache-maven-3.0.5-bin.tar.gz -C /usr/local
$ cd /usr/local
$ sudo ln -s apache-maven-3.0.5 maven
 3. Tạo biến môi trường
$ sudo vi /etc/profile.d/truongpm.sh
Chú ý: trên máy của tôi, tất cả các biến môi trường đều được đặt trong file truongpm.sh, bạn có thể đặt trong file khác
Nhập nội dung file như sau:
export M2_HOME=/usr/local/maven
export PATH=${M2_HOME}/bin:${PATH}
4. Cuối cùng, hãy kiểm tra việc cài đặt bằng lệnh
$ mvn –version
Nếu console hiển thị thông số máy ảo java là cài đặt thành công.

Tiếp theo, để cài đặt maven plugin trong eclipse thì làm theo các bước sau:
  1. Open Eclipse IDE
  2. Click Help -> Install New Software...
  3. Click Add button at top right corner
  4. At pop up: fill up Name as "M2Eclipse" and Location as "http://download.eclipse.org/technology/m2e/releases" or http://download.eclipse.org/technology/m2e/milestones/1.0
  5. Now click OK


Thứ Ba, 22 tháng 11, 2016

Cài đặt Apache Flume trên Centos

Trong bài trước, đã giới thiệu tổng quan về công cụ thu thập dữ liệu Apache Flume. Bài này sẽ hướng dẫn cách cài đặt và chạy thử ví dụ thu thập dữ liệu tự động từ twitter với Flume. 
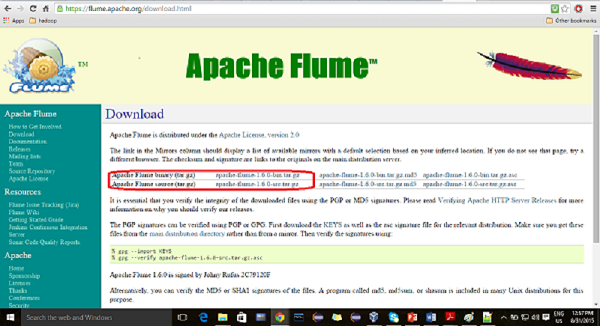
Để tải về, có thể vào trang https://flume.apache.org/
Installing Flume
Tải về bản: apache-flume-1.6.0-bin.tar.gz

Cài đăt JAVA 8 (JDK/JRE 8u111) trên CentOS/RHEL và Fedora

Hadoop được xây dựng trên ngôn ngữ Java, vì vậy, để cài đặt được Hadoop, trước tiên phải cài đặt môi trường Java cho tất cả các máy trong cụm máy chủ. Tài liệu dưới đây hướng dẫn cài đặt Java 8 trên môi trường CentOS/RHEL và Fedora. JDK 8 được xuất bản vào tháng 3, 2014 . Có thể tham khảo thêm về phiên bản trên tại đây.
Java on Linux

Thứ Hai, 21 tháng 11, 2016

Keedio FTP Flume Source

banner_0009
Keedio-flume-ftp was created to meet the need of processing information stored on a FTP server. Information is processed by Apache Flume, whose base data information unit is an “event”.
Usually, in an FTP server, data is loaded in bulk, which is a completely different usage paradigm than the event-based paradigm on which Flume relies.

Apache Flume - Giới thiệu

What is Flume?

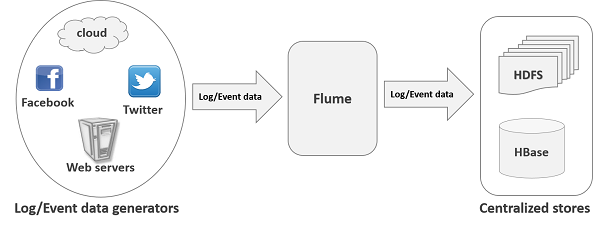
Apache Flume is a tool/service/data ingestion mechanism for collecting aggregating and transporting large amounts of streaming data such as log files, events (etc...) from various sources to a centralized data store.
Flume is a highly reliable, distributed, and configurable tool. It is principally designed to copy streaming data (log data) from various web servers to HDFS.
Apache Flume

Thứ Năm, 17 tháng 11, 2016

Tutorial: Configuring a Sensor Node and IoT Gateway to Collect and Visualize Data — Part 2

4278599177_fbb4d9ed96_o
In part one, we discussed the scenario and use case of sensor nodes and IoT gateways. Part two will cover the configuration aspects of the sensors, development boards, and the radio.

Tutorial: Prototyping a Sensor Node and IoT Gateway with Arduino and Raspberry Pi – Part 1

15996478142_da7d563d31_z
Part one of a two-part tutorial about using an open source software stack to aggregate, store and visualize sensor data in real-time for industrial environments. In part two, we will wire up the sensors and radios to configure an Arduino and Raspberry Pi.